

Hello! As a developer for the last four years on the Advertising Studio team at Salesforce, I’ve learned the importance of communication throughout my team while contributing to our codebase. This can take many forms, such as comments within the code, concise descriptions of user stories, or commit history in version control, which tells the technical story of an application. In this post I’ll focus on the latter. While this “top 5” list uses Git & GitHub for the examples, the ideas can be universally applied.
#1 Branch Out
If you’re new to the world of version control, branching is probably the second step you’ll take (after pulling down a copy of your new project from GitHub). Keep one ‘master’ branch as the source of truth for a readily deployable copy of the application. Nothing goes into ‘master’ unless it’s ready for the world to see or your customers to use. Never (or almost never) make changes directly to ‘master’; it represents the final version of your work that has been peer-reviewed and tested. Accordingly, all of the work completed in a feature branch should be summarized in a single, concise commit when merged into ‘master’.
When writing a feature or bugfix, create a branch from ‘master’, complete your work on the branch, then submit a pull request to a qualified individual for review of your changes before contributing them to ‘master’. The reviewer is responsible for preventing mistakes from making it into the ‘master’ branch and providing helpful tips or feedback to improve your code.
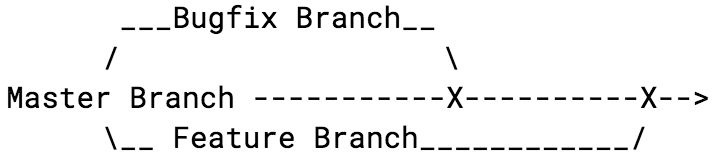
Branching properly provides organization essential to promptly resolving a bug. In such an event, you can stop work on your feature, return to ‘master’, and create a new branch to fix the bug. Once your bugfix is deployed, return to your feature branch and continue work. For similar reasons, ‘master’ must be kept clean so that a teammate or contributor is guaranteed a working copy of the app upon which to begin development.
The example above can be visualized as:
To see how this works in practice, take a look at the network graph of a Salesforce GitHub repository: https://github.com/salesforce/awd-lstm-lm/network
#2 Commit Early, Commit Often
Although stories and bugs should be broken down into consumable units of work, it’s likely that this work should be made even more granular during development. Each time anything substantial is completed, add the changes and commit. This serves three purposes:
- The pull request becomes more approachable to the reviewer as they’ll know what changes apply to a logical step of completing the work.
- If code is lost or a commit botched (neither are hard to do), you’ll have less to rewrite or untangle from a small commit compared to a large one.
- Debugging an application is made significantly easier when you have many small commits to step through.
Below is an example commit log given the story “As a user, I can navigate between web pages without modifying the browser’s URL”.

#3 Follow Style Guidelines
Guidelines are an easy source of debate (tabs or spaces, anyone?), but they’re not there just to create painstaking conformity. They should make it easy for any contributor to understand what others have done and guide the contributor in formatting their own work.
To begin, be descriptive and clear with the effect your change will have. Commit messages can be written in the imperative or past tense (be consistent though). You want to tell the reader, which is sometimes your future self, what the code in the commit is doing. For example, “fix special character encoding in titles” is better than “fix titles”. Remember, someone is reading your commit log to get a quick summary of changes, so keep your messages to under 50 characters. Your name and date are included with each commit, so there’s no need to add them yourself. Search for “commit message standards” to learn more.
#4 Squash!
After concluding your work on a feature branch (and committing often!), there will be many commits with many messages. We don’t want all of these commits to be added to ‘master’ as they would quickly pile up, especially with multiple project contributors. Squashing commits is just as it sounds: many commits become one, unified commit. This makes it easier for others to read change history of the ‘master’ branch. Keep the commits small for the feature branch, then combine them into one feature commit for ‘master’.
If you find it difficult to represent all of the changes in a single line, create a larger commit message with a subject line, descriptive paragraph, and bullet points as needed. Reference this model if a more detailed message is required: https://tbaggery.com/2008/04/19/a-note-about-git-commit-messages.html
All four commits from the above user story can be squashed into one with the summary: “Add navigation bar”. All changes are consolidated into one commit and the commit summary describes the overall effect of your work.
#5 Read From Another’s Perspective
This nicely squashed set of commits should have a message that is understandable to someone with a general, but not intimate, knowledge of the application. Often, it’s difficult to compile all of your work into a 50-character summary. In this case, refer to styling guidelines and include a few bullet points or paragraphs in the body of the commit message. When writing, think billboard, not dissertation. Before merging your code-reviewed feature into ‘master’, get another’s opinion of your commit message. If they can quickly read and easily understand your changes, you succeeded.
Thanks for reading! Again, the above are a few of my thoughts and opinions regarding commit messages and I hope they serve as catalysts (or reinforcement) toward describing your work to the team. It takes time to improve your skills writing commit messages, but if you put in the effort your teammates (and future self) will thank you.


